Welcome to Lesson #5: the most effective way of guitar tuning.
For years I had a coffee cup on my desk with the words written on it “Tune It or Die”. I finally got rid of it because I thought it was kinda negative… But I understand the sentiment. No one wants to play a guitar that out of tune. Even less to listen to someone playing and out of tune guitar.
If you already know how to tune a guitar, you can just skip over this lesson. But if you don’t… this could be a very important lesson. Nobody wants to play a guitar that’s out of tune, let alone listen to one.
This lesson is divided into two parts. In the first part, we will go through some music theory that you need to know to help you learn how to tune a guitar.
In the second part we’ll go through some tips on guitar tuning.
The Best Method to Tune A Guitar
There are many of guitar tuning including using a pitch fork, the fifth fret method (tuning one string to another by ear), and using an electric guitar tuner. For this lesson we’ll be using an electric guitar tuner.
Why not use the other methods?
The pitch fork method and the “fifth fret method” of guitar tuning require you to tune by ear. Tuning by ear for a beginner is very difficult. It’s hard to hear a small difference in pitch unless you already play an instrument. It is much better to put your energy into using an electronic tuner. This allows you to learn how to tune quickly so you can focus your energy on other aspects of playing guitar.
Want to train your ear? Electronic tuners are also great ear training devices. When you try to tune without a tuner, you don’t really know if a note is exactly in tune or not. With a tuner you can see when it’s in tune. It’s basically giving you feedback, which is the fastest way to develop the ability to hear the differences in pitch.
Types of Electronic Guitar Tuners
There are many types of electronic tuners. I prefer to use a clip on guitar tuner on the acoustic guitar. It picks up the vibrations of the strings through the headstock. It’s more stable than the ones that use a microphone because they pick up noise from the room around you as well and makes it harder to tune.
The clip on tuner also keeps both of your hands free so you can turn the tuning key with one hand and pluck the string with the other… all the while watching the dial the tuner conveniently propped up on your headstock.

Part 1 – A Little Music Theory
Okay, let’s talk a little bit of theory. We already talked about the names of the strings in lesson one. Did you skip over that one? Go back to that lesson if you did and practice the names of the strings. You’ll need it for learning how to tune a guitar.
Let’s talk about the concept of “sharp (♯) and flat (♭)”. Sharp basically means high and flat means low. If a note is sharp, it means the pitch is high, and if the note is flat, it means the pitch is low.
If you say you want to make a note sharper, you’re going up in pitch. When tuning a guitar, you would turn the tuning key for that string to make it tighter… making it go up in pitch.
Flat means going down in pitch. When tuning a guitar, you would turn the tuning key for that string to loosen it… making it go down in pitch.
Musical Alphabet
Okay, let’s talk about the musical alphabet now. The musical alphabet consist of 7 letters – A B C D E F G… and then you start over. There are also notes between many of the letters. Between A and B, there is A sharp. It’s just a half step above A.
There are two pair of notes that do not have a sharp or flat: between B and C and E and F. You want to memorize those two. B and C, and E and F. This mean there’s no E sharp or F flat.
You need to also know that some notes actually have two different names.
Let’s take that A again. Imagine we want to get to the note A sharp. You can get there by going up a half step, so A to A♯ (remember… this “#” is a sign for sharp). You can also go down from the note B, so B to B♭ (this “b” is the sign for flat). B flat and A sharp are the same note. They sound the same, but they look different in writing. We call that enharmonic.
You need to know that when you look at your tuner. You might see “A#” or might see “Bb”. It’s the same note — A# and Bb are enharmonic.
Here's a summary of what we've learned so far.
Guitar Tuning Theory Summary
In summary…
- There are seven letters in the musical alphabet.
- There are notes in between the letters A, A ♯, B, C, C ♯, D, etc.
- There are two sets of notes where there is nothing in between: B to C, and E to F.
- Finally, there can be two names for one note – A♯ and B♭ are one and the same. D♯ and E♭ are the same note.
Now let's move on to the demonstration…

How to Tune A Guitar Demonstration
When tuning, you want to tune one string at a time. You can start with your sixth string.
If using a clip on tuner go ahead and clip the tuner onto the headstock. Now turn it on and pluck your string. You’re looking for “E”… but if it’s out of tune you’ll have to adjust it to get there.
Though every tuner is different, the display will show you what actual note your string is tuned to. Adjust the tuning key of the guitar for that string until it says the correct note.
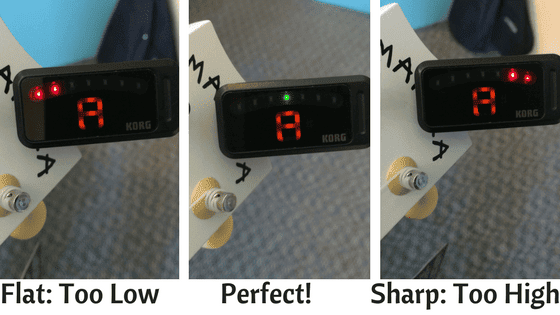
Once it’s tuned to the right note, your tuner should tell you in some way if the note is a little flat or a little sharp (too high or too low). Keep turning the peg until the note is in tune.

So that’s it for tuning a guitar!
Practice Makes…
Guitar tuning is something you need to go and practice. Be patient with yourself. I suggest doing a little bit each day for a week or so, and you should feel pretty confident by then.
